Slim down your webpack bundle: Effectively reducing loading time
Avoid needless waiting for your users: Learn how to analyse and optimize your webpack bundle size.
Slimming down your payload has a number of benefits, including:
- Your site will load quicker
- Javascript parsing and execution will be faster (important for mobile apps)
- Easier on the user's mobile data plan
Initial Analysis
To get started, you will need to generate a log file using webpack and the --json parameter. You should also include the --profile parameter to add timing information, and the --progress parameter to display the status of the build process.
We’ll cover how to further optimize each parameter later on. So for now, the full command will look like so:
webpack-build-log.json
For an ad-hoc solution to get the history of log files, you can run the following:
"webpack-build-log.`date +%Y-%m-%d_%H-%M-%S`.json"
We have generated a log file! What’s next?
Now that we have a log file, we can pass it to various services that will, in turn, provide you with aggregated information about your build process. One of those services is the official analysis tool.
This online version supports drag and drop, but don’t worry—the log file itself will not leave your machine. You can also find more tools in the official docs.
Our tool of choice:
webpack-bundle-analyzer For bundle optimization, webpack-bundle-analyzer happens to be the most useful. It is also widely used within the community.
You can use the webpack-bundle-analyzer as a standalone command line tool, or as a plugin within your webpack config. The tool will display a dependency graph using a treeview, visualizing the relative sizes of every file in your bundle.
Note: Make sure to pass the directory of your generated bundle as second parameter to get the real, parsed, and gzipped size of every file.
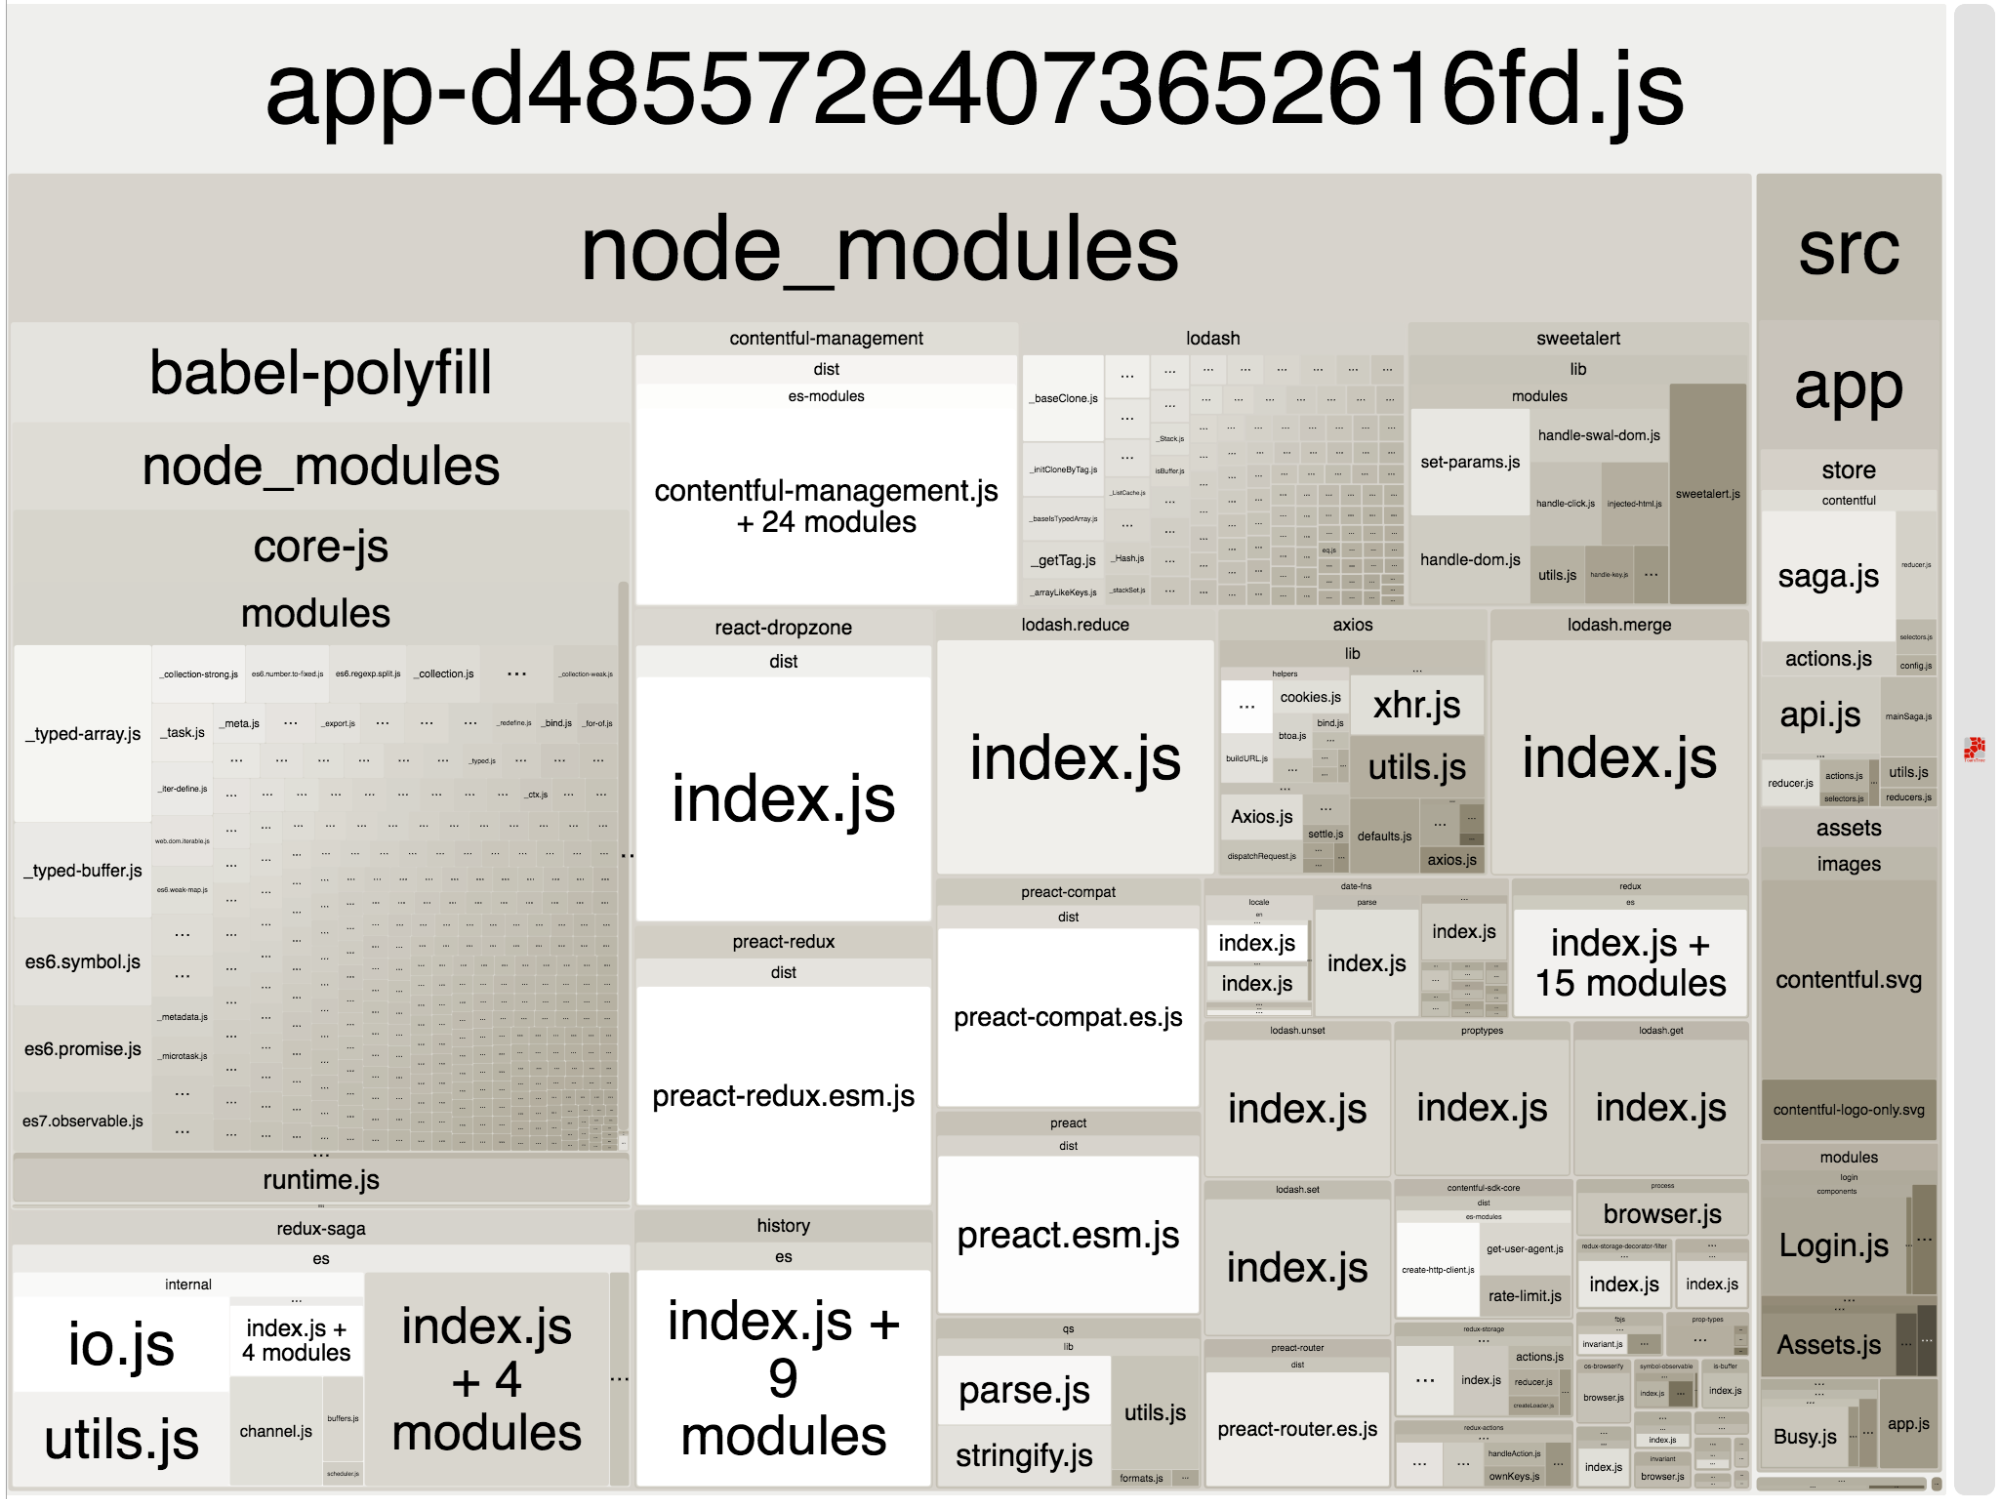
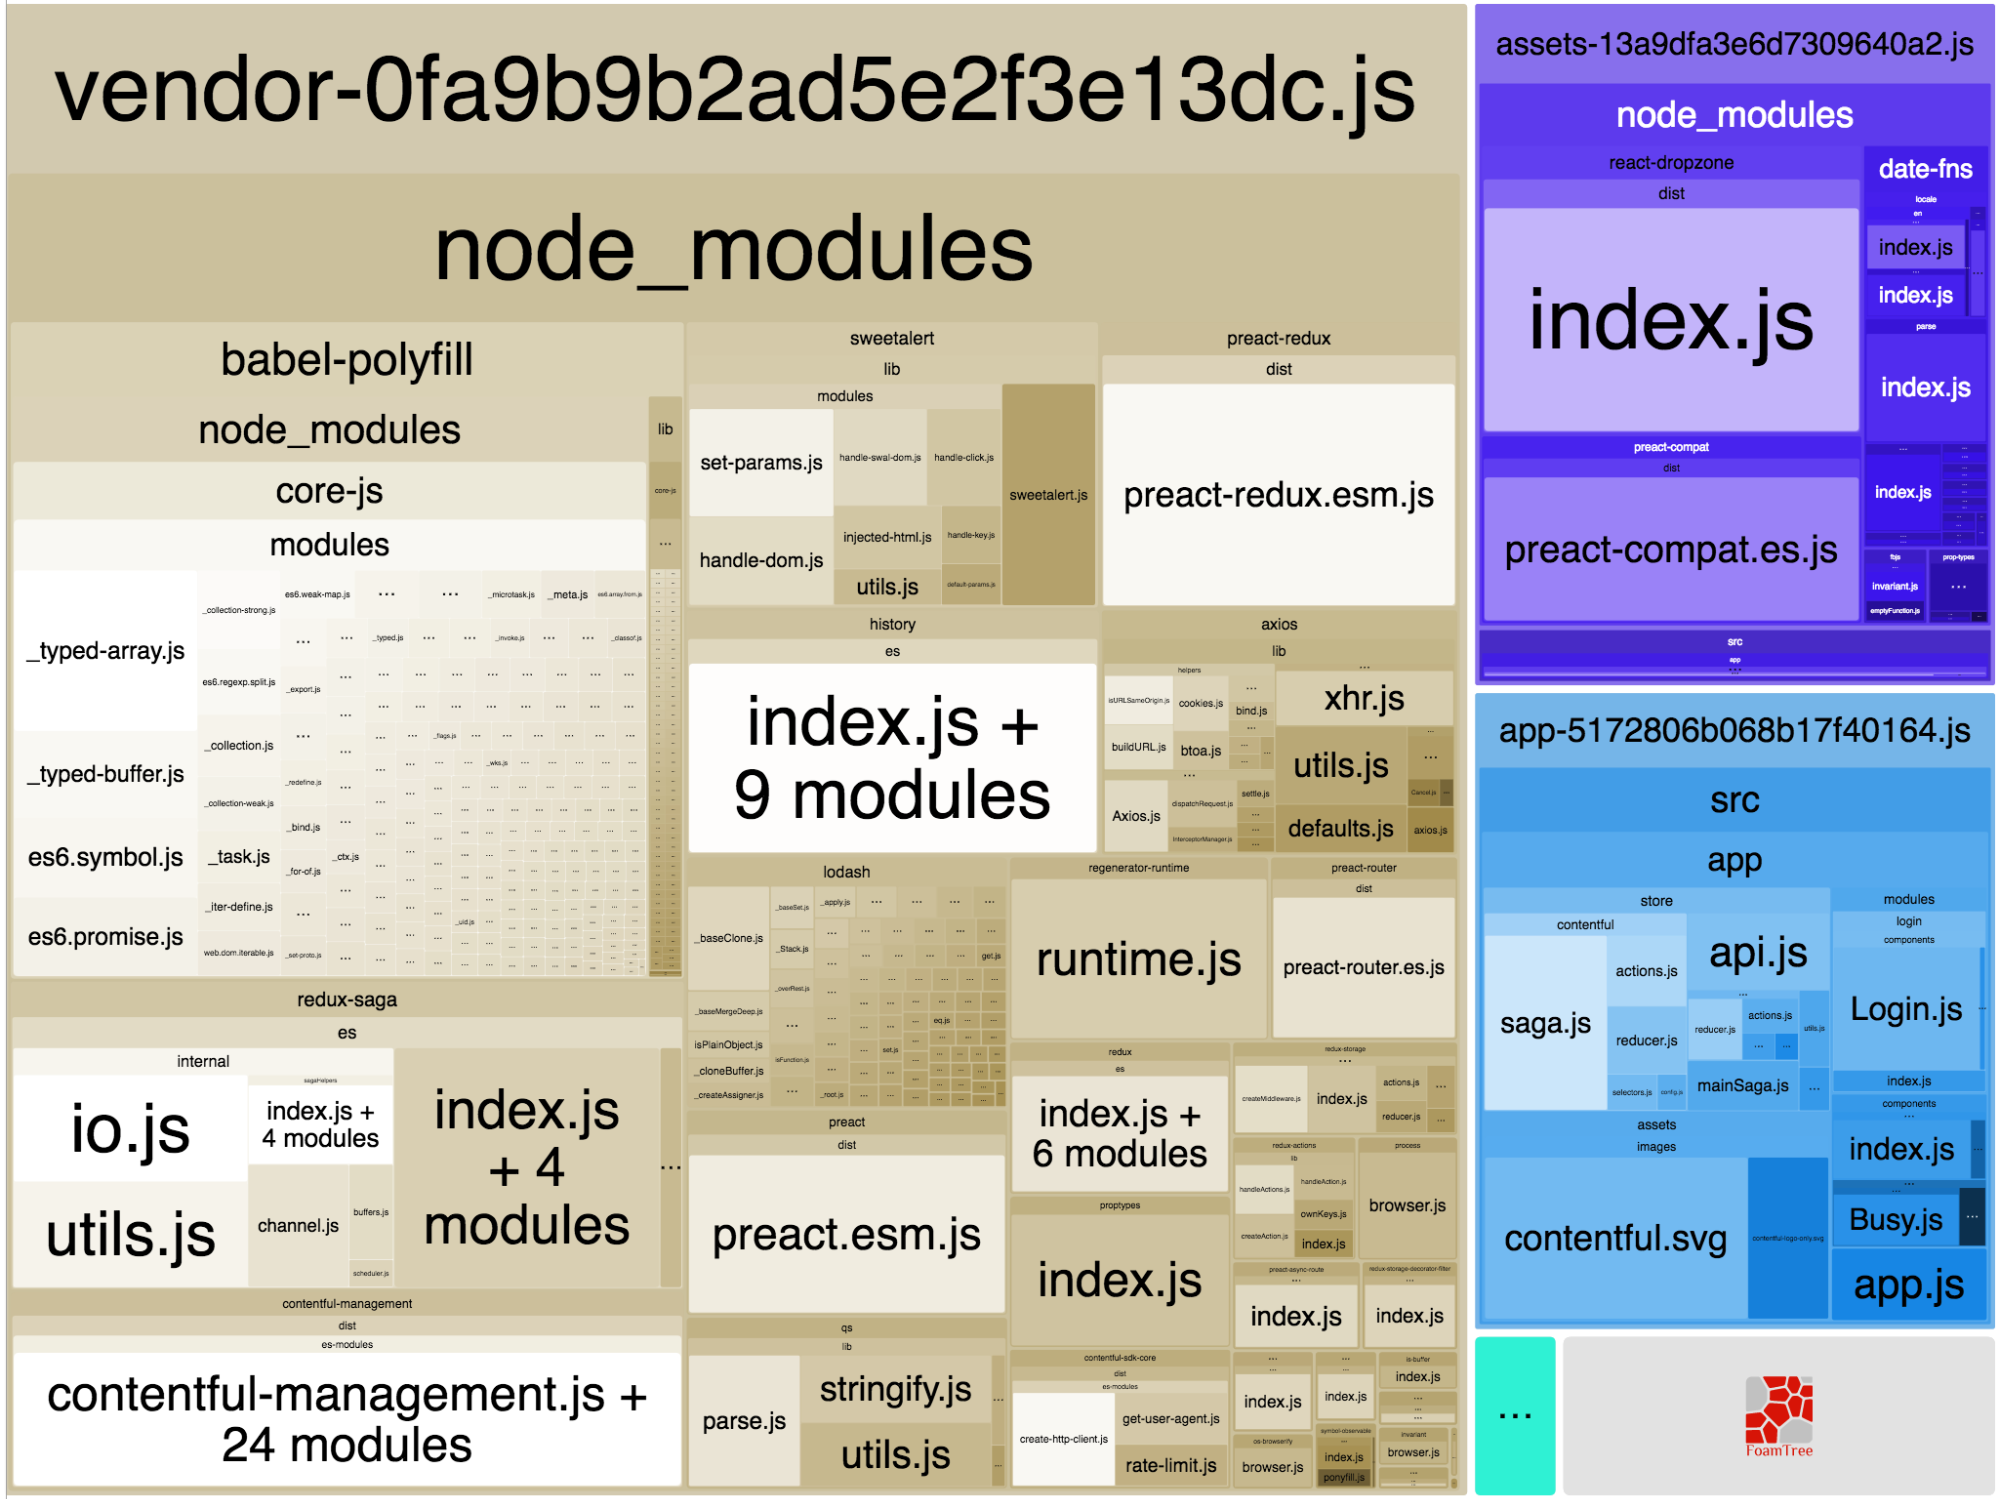
The file-upload-example app in all its unoptimized glory looks like this in the bundle-analyzer:
webpack-bundle-analyzer webpack-build-log.json dist/app
And will result in a diagram similar to this:
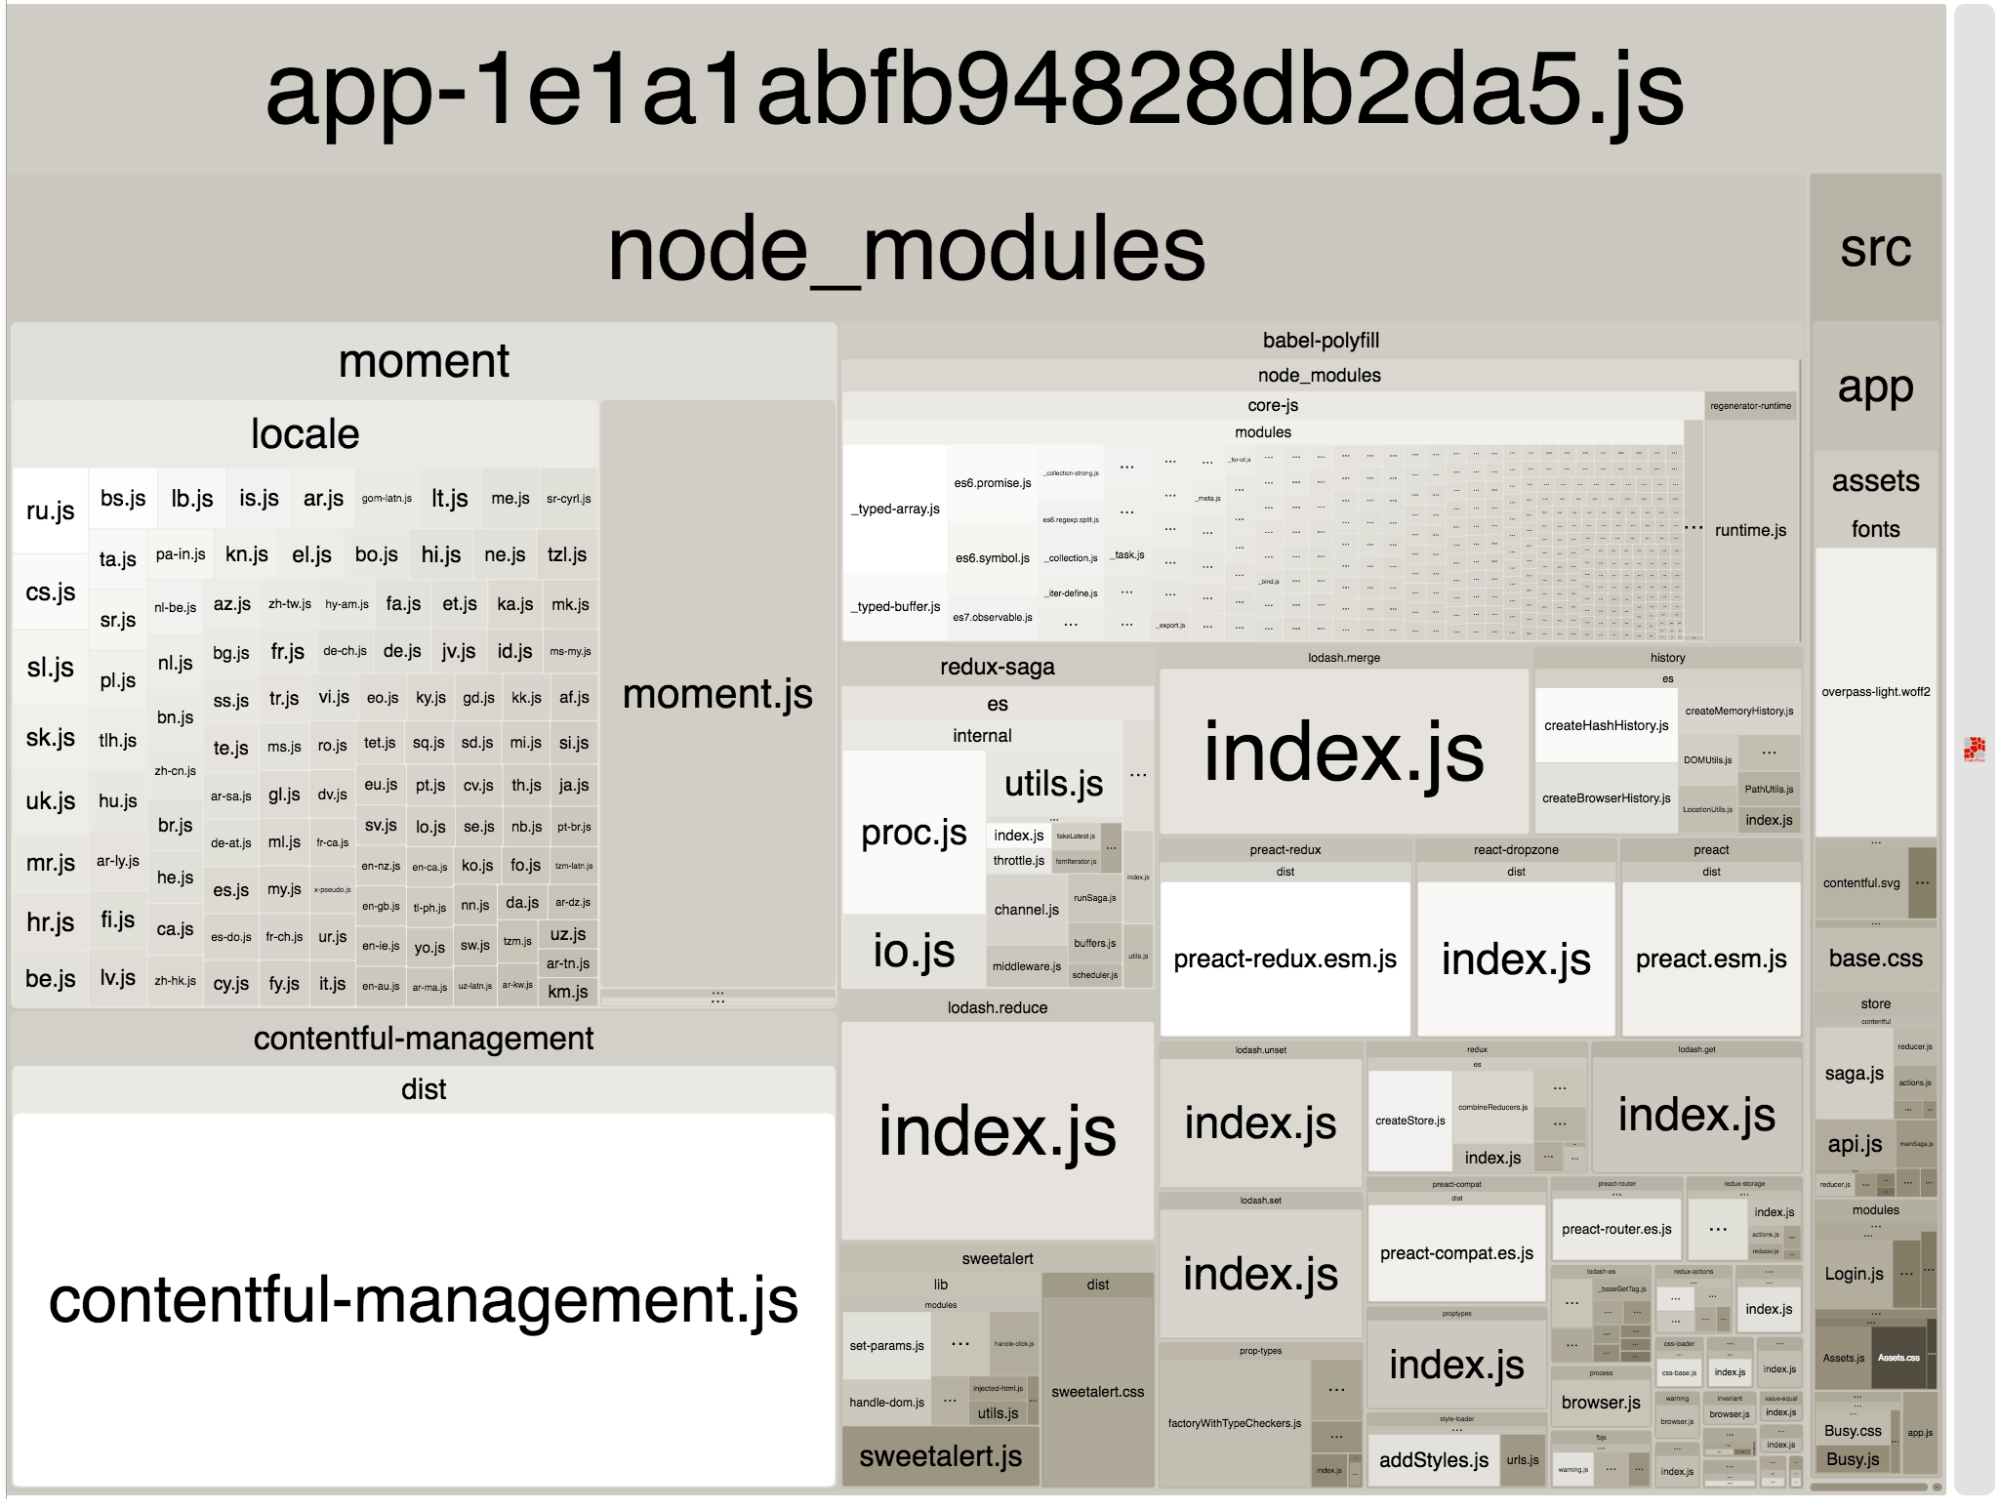
Our (intentionally unoptimized) app has a whopping 1.69MB stat size. The app size is 1.76MB parsed and 399.17KB gzipped. Lighthouse says it would take ~3200 ms to the first meaningful paint on a bad 3G connection.
This is far from good, but it’s the perfect starting point for what we’re about to do!
A quick look reveals what this bundle is made of:
- A lot of comments and whitespace because we “accidently” skipped minification
- moment.js with all it's locales: 453.34KB pure code / 90.28KB gzipped
- contentful-management as single bundle: 313.08KB pure code / 57.26KB gzipped
- babel-polyfill with: 225.91KB pure code / 48.92KB gzipped
- Also, we can spot multiple occurrences of lodash in the bundle
Let’s continue and get this monster into shape with our healthy webpack bundle diet.
The in-house way of putting your bundle on a diet:
First of all, I want to highlight that webpack has improved greatly. Version 2, and the fairly new version 3, both improved their bundling abilities. Some people say it’s a 50% reduction of the original build time when using version 3.
The webpack project is also backed by many companies, and the fact that some brilliant people now have time allocated by their employer to improve it—new versions get released almost daily.
The fastest way to reduce the payload is to run webpack with the -p switch. This will enable the most basic production settings:
webpack -p
The -p switch alone significantly reduced the bundle size. This will have a roughly 30% improvement on the first meaningful paint on a low-end mobile phone.

Running webpack with the -p switch will carry out the following tasks:
- Minification using the UglifyJsPlugin
- Runs the LoaderOptionsPlugin (see its documentation)
- Sets the Node.js environment variable to
productiontriggering certain packages to compile differently
Sometimes, executing webpack using only the -p switch works well enough. However, it is good to know that the -p switch does not optimize the following:
- The Node.js environment variable will not be set to
productionin webpack.config.js. If you rely on this setting in your config, you still have to prepend the webpack command withNODE_ENV=production - CSS created by css-loader is not minimized by default, so you probably want that in production
- Extracting css into its own file is more effective and caches better. You can use the extract-text plugin for that.
- Finding the correct source map setting for your needs is essential. We use the quick
cheap-eval-source-mapin development, andfalsefor no source map at all in production.
Basic webpack configuration optimization
In this section, you’ll learn how to:
- Minify the code
- Add the loaderOptionsPlugin to enable minify
- Make sure everything is set to production mode
- Enable module concatenation
- Extract the css to enable better cacheability, parallel downloading and parsing
- Enable tree-shaking by using the new es modules import syntax
While webpack -p is one of the fastest ways to reduce the payload. But saving bytes on the wire is always important, and that’s why we’re offering you an alternative solution.
Fortunately, decreasing the bundle size and increasing load speed on your own is not that hard. We can supply our own config to UglifyJS, or use another minification plugin. All of this will take place in your webpack.config.js file.
To get started, I’d recommend you do the following:
1. Minify the code
Add webpack.optimize.UglifyJsPlugin. For reference, you can also check out the plugin config and the uglify config options. If you want to deliver ES6 or newer code, you have to use babel-minify (formerly known as babeli) with its webpack plugin. There are also other versions of UglifyJS that support ES6 code, but as far as I can tell, none of them are stable enough yet.
A typical config would be something like:
const webpackConfig = {
  ...
  plugins: [
    ...
    new webpack.optimize.UglifyJsPlugin({
      compress: {
        screw_ie8: true,
        warnings: false
      }
    })
    ...
  ]
}
2. Add the loaderOptionsPlugin to enable minify
Because the plugin configuration changed from webpack 1 to webpack 2, this module tries to bridge the gap for plugins that were not upgraded to the new syntax. The code below ensures all (older) plugins are minimized and no longer include debug code.
const webpackConfig = {
  ...
  plugins: [
    ...
    new webpack.LoaderOptionsPlugin({
      minimize: true,
      debug: false
    })
    ...
  ]
}
3. Make sure all dependencies are built in production mode
Many libraries only include code for specific environments. React is a good example of this. With the EnvironmentPlugin, you can specify values for the environment variables that are typically used by these libraries to opt-in or out of environment-specific code.
const webpackConfig = {
  ...
  plugins: [
    ...
    new webpack.EnvironmentPlugin({
      NODE_ENV: 'development',
      DEBUG: false
    })
    ...
  ]
}
Note: EnvironmentPlugin is actually a shortcut for a common pattern with the DefinePlugin.
4. Enable module concatenation
With the ModuleConcatenationPlugin, your dependencies and the related modules are wrapped in a single function closure as opposed to having function closures for each module. This process has minimal impact on the bundle size, but it can speed up the execution time of your code.
const webpackConfig = {
  ...
  plugins: [
    ...
    new webpack.optimize.ModuleConcatenationPlugin()
    ...
  ]
}Note: Webpack has a nice visualization of this output on their GitHub repository.
5. Extract the CSS to enable better cacheability, parallel downloading, and parsing
Use the ExtractTextWebpackPlugin to extract text from specific loaders into their own files. This is common practice to get separated CSS files that can be cached by the browser and therefore, reduce your bundle size.
The code snippet below will also make sure that the css-loader is minimizing your CSS for production.
const ExtractTextPlugin = require('extract-text-webpack-plugin')
const __PROD__ = process.env.NODE_ENV === 'production'

const webpackConfig = {
  ...
  module: {
    rules: [
      {
        test: /\.css$/,
        include: [
          join('your', 'static', 'css', 'files'),
          /node_modules/
        ],
        use: ExtractTextPlugin.extract({
          fallback: 'style-loader',
          use: [
            {
              loader: 'css-loader',
              options: {
                importLoaders: true,
                minimize: __PROD__
              }
            }
          ]
        })
      }
    ]
  },
  ...
  plugins: [
    ...
    ExtractTextPlugin('style.css')
    ...
  ]
}

You can find the actual commit for this improvement here.
Sweet, this just gave us a 21% boost in the gzipped size compared to the default webpack -p approach. The first meaningful paint in Lighthouse, however, was only minimally improved. This is due to the delay of the emulated 3G connection, and we might not see much more improvement there going forward. There’s a chance that server-side rendering could help here, but our webpack diet doesn’t cover this.
6. Enable tree-shaking by using the new ES Modules syntax
ES5/ES6 Modules is the first standardized way of encapsulating JavaScript into reusable modules. It will replace CommonJS, UMD, AMD and others, plus it has been supported in Chrome since the beginning of 2017. We may see Node natively supporting ES6 Modules soon, also.
So how does this benefit your webpack? The new ES Modules syntax allows you to tree-shake your code, which means it will automatically exclude unused parts of code in your webpack bundle. It’s basically dead code elimination with some other neat tricks. This can significantly reduce your bundle size. If you want to dive deep into this—what it exactly is and how it works—here’s some recommended reading. Rollup, another JS module bundler besides webpack, has a wonderful explanation about the benefits using ES Modules. And this article by Rick Harris, the inventor of Rollup, explains the differences between dead code elimination and tree-shaking.
TL;DR When using webpack 2 or newer, the only thing you have to do is to replace your require with import statements. With our SDK, your code would go from this:
const { createClient } = require('contentful');To this:
import { createClient } from 'contentful';Further: How to avoid dependency duplication
A simple way to avoid dependency duplication is to try and keep your dependencies up to date. This will help ensure that you don’t have the same dependency in different versions in your bundle.
In case a dependency does not have a version with an up to date lodash, try to open an issue on GitHub and ask the maintainer to update the dependencies and then re-release it. Hinting about the need for a dependency update in the issue queue is often enough to spark action.
The new npm 5 can also be an issue. If you update your dependencies one by one, the deduplication might fail due to your lock file—and you might end up with some duplicate dependencies. This process gave my colleague Khaled Garbaya a headache some time ago.
The following command can help to reduce dependency duplication, especially for projects that have been maintained over a longer period of time:
rm package-lock.json && npm iDependency related optimizations
Here will tackle more detailed optimizations related to some common modules, like Moment.js, Babel, and Lodash.
In this article, we’ll cover how to:
- Remove locales when utilizing Moment.js
- Implement the Date-fns library as a slimmer alternative to Moment.js
- Only transpile what you need to with
babel-preset-env - Avoid code duplication with Lodash
Cease the Moment.js
Moment.js is a library that helps you parse, validate, manipulate, as well as display dates and times in JavaScript.
The library supports many locales by default. This is great—but because it’s available in many languages, its payload is rather big. Fortunately, we can fix that. We’ll start by using the webpack IgnorePlugin in your webpack.config.js file to remove any unwanted leftovers from your bundle.
If you want to strip out all locales, you can do this by adding the following config:
new Webpack.IgnorePlugin(/^\.\/locale$/, /moment$/)In some cases, you may need a couple of locales, but not all of them. Regex can help us out here too. Here’s an example if we only want English and German:
new webpack.IgnorePlugin(/^\.\/locale\/(en|de)\.js$/, /moment$/)You can also achieve the same results using the ContextReplacementPlugin. Let’s take the same example, but specify which variants of the German language we want.
With all variants, including standard German (de) and the Austrian dialect (de-at):
new webpack.ContextReplacementPlugin(/moment[/\\]locale$/, /en|de/)Without variants (only de):
new Webpack.ContextReplacementPlugin(/moment[/\\]locale$/, /(en|de)(?!-)/)The technique used above can be recycled for other dependencies and files that we want to keep out of our optimized bundle.
Here’s a look at how our optimized webpack bundle measures up after removing the Moment.js locales:
| Stat size | Parsed size | Gzipped size | First paint on 3g and low-end mobile | Webpack v3.6 | build time |
|---|---|---|---|---|---|
| intentionally unoptimized | 1.69MB | 1.76MB | 399.17KB | ~ 3292 ms | ⌀ 6.2 s |
| webpack -p | 1.65MB | 640.45KB | 208.79KB | ~ 2276 ms | ⌀ 7.9 s |
| manually optimized | 1.56MB | 564.25KB | 166.39KB | ~ 2240 ms | ⌀ 10.9 s |
| CMA with modules syntax | 1.51MB | 558.71KB | 165.48KB | ~ 2200 ms | ⌀ 11.2 s |
| without Moment.js locales | 1.19MB | 398.78KB | 121.71KB | ~ 1948 ms | ⌀ 10.1 s |
You can find the actual commit on GitHub.
This is already an improvement, but the Moment.js module is still too heavy considering we only need one specific date format for our app. Many cases only use Moment.js for very simple date manipulation or formatting tasks. And since Moment.js does not support tree shaking yet, we need to implement another library: date-fns.
Replacing Moment.js with Date-fns
Date-fns describes itself as, ”the most comprehensive, yet simple and consistent toolset for manipulating JavaScript dates in a browser and Node.js.”
Date-fns is similar to Moment.js in that they have a lot of overlapping functionality. But while Moment.js exposes one big object that can handle everything, date-fns is built for a more functional approach. Additionally, date-fns supports tree shaking when used together with babel-plugin-date-fns, a Babel plugin that replaces generic date-fns imports with specific ones.
As you can see below, utilizing date-fns in conjunction with this plugin will help trim down your bundle size and speed up your build time:
| Stat size | Parsed size | Gzipped size | First paint on 3g and low-end mobile | Webpack v3.6 | build time |
| ---------- | ---------- | ---------- | ---------- | ---------- | ---------- |
| intentionally unoptimized | 1.69MB | 1.76MB | 399.17KB | ~ 3292 ms | ⌀ 6.2 s |
| webpack -p | 1.65MB | 640.45KB | 208.79KB | ~ 2276 ms | ⌀ 7.9 s |
| manually optimized | 1.56MB | 564.25KB | 166.39KB | ~ 2240 ms | ⌀ 10.9 s |
| CMA with modules syntax | 1.51MB | 558.71KB | 165.48KB | ~ 2200 ms | ⌀ 11.2 s |
| without Moment.js locales | 1.19MB | 398.78KB | 121.71KB | ~ 1948 ms | ⌀ 10.1 s |
| date-fns instead of Moment.js | 1.09MB | 354.23KB | 107.27KB | ~ 1902 ms | ⌀ 9.8 s |
Check out the commit for this improvement here.
Only transpile what you need to with babel-preset-env
Now that we’ve chosen a lean toolset for configuring dates, we can find other areas of our bundle to reduce. For instance, in its unoptimized state, our example app uses babel-preset-es2015 which was recently deprecated. This means that we must use another solution—the babel-preset-env package.
The babel-preset-env package is a Babel preset that compiles ES2015+, used in our unoptimized app, down to ES5 by “automatically determining the plugins and polyfills you need based on your targeted browser or runtime environments.”
The configuration for the plugin should be in the .babelrc file and look something like:
{
  "presets": [
    ["env", {
      "targets": {
        "browsers": ["last 2 versions", "safari > 8", "not ie < 11"]
      }
    }]
  ]
}
Something to note is the targets.browsers property. This is where you can set criteria for the included Babel plugins. Each plugin from the latest preset can be included if necessary, such as es2015, es2016, and es2017.
To get a preview of what browsers your configuration includes, you can use browserl.ist. Pass your browser criteria through as a list separated by commas, and the listed browsers will be included in the config file. You can find a query syntax spec on the browserlist repository.
What you get with babel-preset-env alone:
| Stat size | Parsed size | Gzipped size | First paint on 3g and low-end mobile | Webpack v3.6 | build time |
|---|---|---|---|---|---|
| intentionally unoptimized | 1.69MB | 1.76MB | 399.17KB | ~ 3292 ms | ⌀ 6.2 s |
| webpack -p | 1.65MB | 640.45KB | 208.79KB | ~ 2276 ms | ⌀ 7.9 s |
| manually optimized | 1.56MB | 564.25KB | 166.39KB | ~ 2240 ms | ⌀ 10.9 s |
| CMA with modules syntax | 1.51MB | 558.71KB | 165.48KB | ~ 2200 ms | ⌀ 11.2 s |
| without Moment.js locales | 1.19MB | 398.78KB | 121.71KB | ~ 1948 ms | ⌀ 10.1 s |
| date-fns instead of Moment.js | 1.09MB | 354.23KB | 107.27KB | ~ 1902 ms | ⌀ 9.8 s |
| babel-preset-env | 1.09MB | 354.23KB | 107.27KB | - | ⌀ 9.8 s |
See this commit on GitHub.
So the optimization efforts above didn’t help... but why?
It’s because there is a common misconception that babel-preset-env v1 excludes polyfills. But in reality, your import of babel-polyfill is not touched at all in version one. The upcoming version two, however, will finally be able to exclude polyfills. To make this work, we have to upgrade to Babel v7.
First, run these commands:
npm i -D babel-cli@next babel-core@next babel-preset-env@next babel-polyfill@nextThen enable the useBuiltIns flag in the .babelrc file:
{
  "presets": [
    ["env", {
      "useBuiltIns": true,
      "targets": {
        "browsers": ["last 2 versions", "safari > 8", "not ie < 11"]
      }
    }]
  ]
}
Hint: Do not include babel-polyfill via an webpack entry. Instead, you should have it as an import statement at the beginning of the entry code file of your app.
Let’s take a look at our bundle size now:
| Stat size | Parsed size | Gzipped size | First paint on 3g and low-end mobile | Webpack v3.6 | build time |
|---|---|---|---|---|---|
| intentionally unoptimized | 1.69MB | 1.76MB | 399.17KB | ~ 3292 ms | ⌀ 6.2 s |
| webpack -p | 1.65MB | 640.45KB | 208.79KB | ~ 2276 ms | ⌀ 7.9 s |
| manually optimized | 1.56MB | 564.25KB | 166.39KB | ~ 2240 ms | ⌀ 10.9 s |
| CMA with modules syntax | 1.51MB | 558.71KB | 165.48KB | ~ 2200 ms | ⌀ 11.2 s |
| without Moment.js locales | 1.19MB | 398.78KB | 121.71KB | ~ 1948 ms | ⌀ 10.1 s |
| date-fns instead of Moment.js | 1.09MB | 354.23KB | 107.27KB | ~ 1902 ms | ⌀ 9.8 s |
| babel-preset-env v2 | 1.04MB | 332.4KB | 100.23KB | ~ 1820 ms | ⌀ 9.8 s |
Find the actual commit for this improvement here.
We’ve almost reached the 100KB mark for our gzipped size, but we are not done yet—we can still squeeze more out of the bundle.
Avoiding code duplication with Lodash
Lodash is a JavaScript utility library that claims to deliver modularity and performance. It is currently available as lodash, lodash-es, lodash-amd, and about 286 other module variants, which only contain one method of Lodash.
Your dependencies might also depend on other versions of Lodash. This can result in a lot of code duplication because any of these dependencies might use different export of Lodash. To prevent this, we can take the following steps:
Step 1: Transform generic Lodash requires to cherry-picked ones
This can be achieved using babel-plugin-lodash and can help to decrease the bundle size.
The following should be added to your .babelrc file:
{
  "plugins": [
    "lodash"
  ]
}
Step 2: Remove unnecessary lodash functionality
We can do this using the lodash-webpack-plugin which works great in combination with babel-plugin-lodash.
Our contentful.js SDK currently requires these Lodash features:
new LodashModuleReplacementPlugin({
  caching: true,
  cloning: true,
  memoizing: true
})
Additionally, our contentful-management.js SDK needs the following:
new LodashModuleReplacementPlugin({
  caching: true,
  cloning: true
})
Just keep in mind that your other dependencies still might need some of these features.
Step 3: Avoid Lodash variant duplication
First, identify all the lodash variants in your production dependencies:
$ npm list --prod | grep "lodash\(\.\|-es\|-amd\)" | grep -v "deduped"
│ ├── lodash-es@4.17.4
│ ├── lodash.isfunction@3.0.8
│ ├── lodash.isobject@3.0.2
│   └── lodash.merge@4.6.0
│ ├── lodash.get@4.4.2
│ ├── lodash.reduce@4.6.0
│ ├── lodash.set@4.3.2
│ └── lodash.unset@4.5.2
Now create webpack resolve aliases for every package in your dependency tree. To do this, alias them to the cherry-picked version of the basic Lodash package.
Here is an example of what your webpack config can look like:
const webpackConfig = {
  resolve: {
    alias: {
      'lodash-es': 'lodash', // our internal tests showed that lodash is a little bit smaller as lodash-es
      'lodash.get': 'lodash/get',
      'lodash.isfunction': 'lodash/isFunction',
      'lodash.isobject': 'lodash/isObject',
      'lodash.merge': 'lodash/merge',
      'lodash.reduce': 'lodash/reduce',
      'lodash.set': 'lodash/set',
      'lodash.unset': 'lodash/unset'
    }
  }
}
And let’s check our bundle:
and low-end mobile | Webpack v3.6
build time | | ---------- | ---------- | ---------- | ---------- | ---------- | ---------- | | intentionally unoptimized | 1.69MB | 1.76MB | 399.17KB | ~ 3292 ms | ⌀ 6.2 s | | webpack -p | 1.65MB | 640.45KB | 208.79KB | ~ 2276 ms | ⌀ 7.9 s | | manually optimized | 1.56MB | 564.25KB | 166.39KB | ~ 2240 ms | ⌀ 10.9 s | | CMA with modules syntax | 1.51MB | 558.71KB | 165.48KB | ~ 2200 ms | ⌀ 11.2 s | | without Moment.js locales | 1.19MB | 398.78KB | 121.71KB | ~ 1948 ms | ⌀ 10.1 s | | date-fns instead of Moment.js | 1.09MB | 354.23KB | 107.27KB | ~ 1902 ms | ⌀ 9.8 s | | babel-preset-env v2 | 1.04MB | 332.4KB | 100.23KB | ~ 1820 ms | ⌀ 9.8 s | | avoiding lodash duplication | 841.94KB | 287.42KB | 89.64KB | ~ 1708 ms | ⌀ 9.0 s |
Check out this commit on GitHub.
The pure minified file is now below 300KB and when gzipped, it will send less than 100KB over the net. That’s pretty impressive—but there's always room for improvement. If anyone has any further tricks, start a discussion on our community forum.
Split up your bundle and apply lazy loading
Webpack by default squeezes your code and assets into one bundle, and with all of the improvement we made in the last parts, we are almost at the maximum of what we can achieve with JavaScript and CSS optimizations. But there are a few more tricks that you should know about.
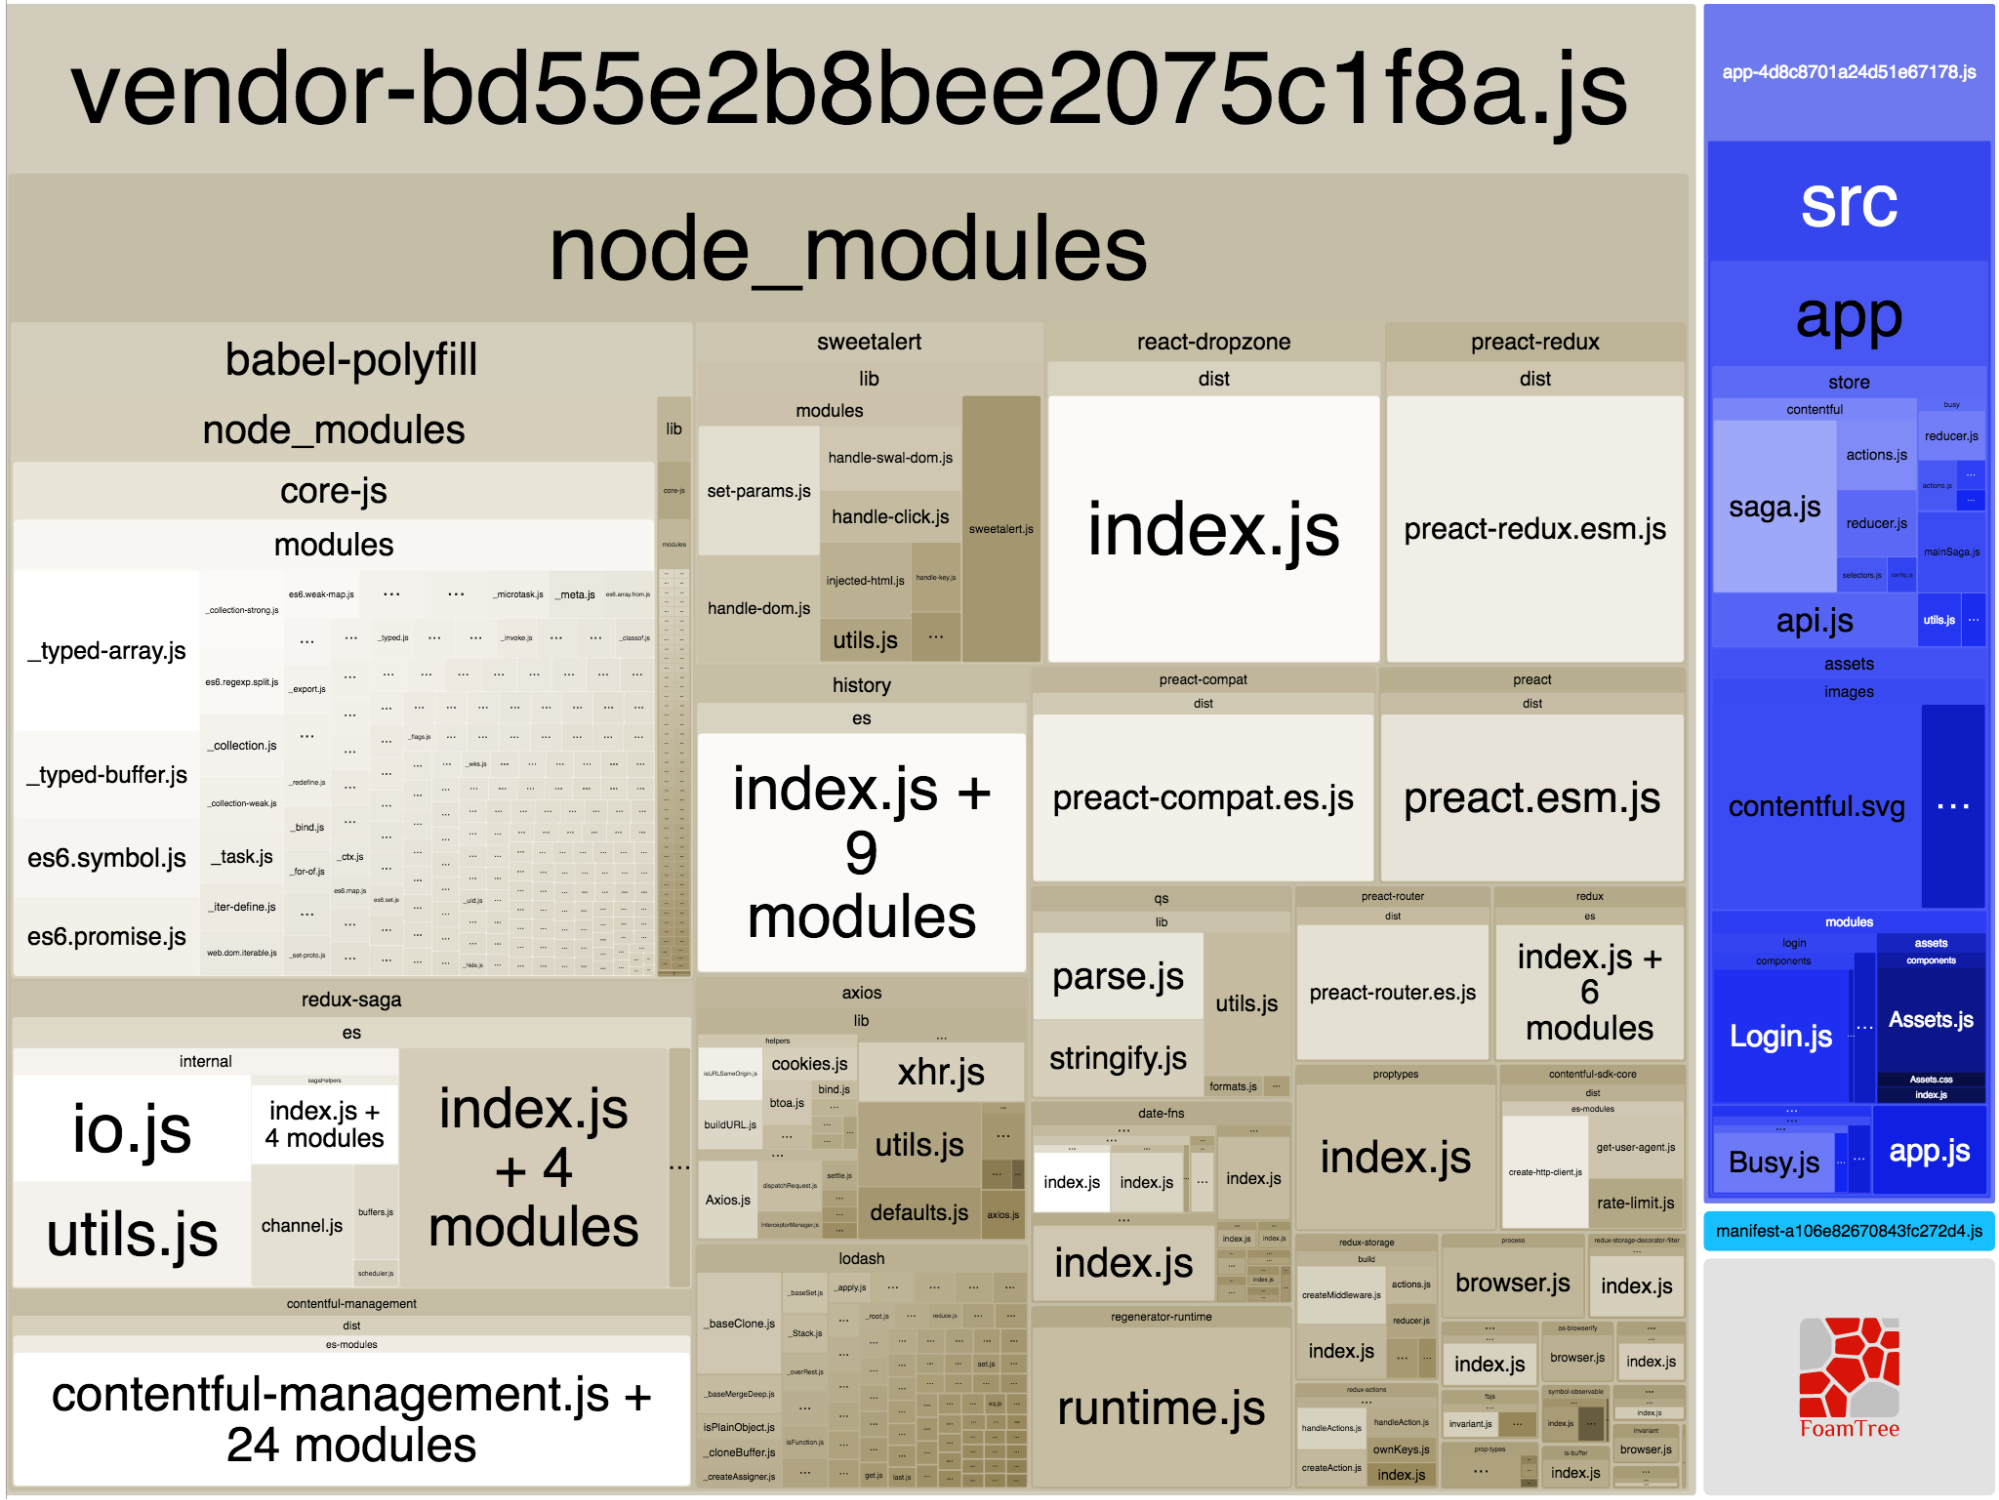
Getting started with chunking
We’ll start by using the so-called chunking process to split the bundle up into multiple chunk files, which enables browsers to do very effective caching. We will put all libraries into a vendor chunk and then separate it from the business logic.
Because library updates are not as common as changes to your app’s code, they only need to redownload the chunk that contains your actual app. The libraries will stay cached on their machine until you purposefully update them.
Afterwards, we’ll split up your app code into multiple chunks and then set up your app to only transmit code that is relevant to the current route where the user is looking. Code related to other routes will be loaded later, and only when the user needs the code. This principle is called lazy loading and the webpack docs have a wonderful guide about lazy loading right here.
Webpack recommends a maximum chunk size of 250kb to avoid long running parsing of your code. This is especially important on low-end devices and is easily achievable with chunking and lazy loading.
Note: I want to thank John Tucker for his excellent medium article about the webpack commons chunk plugin because my code snippets are based on his article.
The quickest option—create a vendor chunk automatically
This is a very straightforward but effective version, especially when you can’t invest the time for detailed splitting or it’s not necessary for your app:
new webpack.optimize.CommonsChunkPlugin({
  name: 'vendor',
  minChunks: ({ resource }) => (
    resource !== undefined &&
    resource.indexOf('node_modules') !== -1
  )
}),
new webpack.optimize.CommonsChunkPlugin({
  name: 'manifest',
  minChunks: Infinity
})
The code above creates a vendor chunk that includes all of your dependencies out of the node_modules folder. This is preferred over manually creating the vendor chunk since it ensures you do not leave out any required dependencies.
Another chunk called manifest will also be created. This specific chunk contains the loader logic for the webpack chunks. Make sure to include the manifest as the first chunk in your HTML, followed by the other script tags.
Important: To enable effective caching and cache busting, ensure that your chunks include their hash value in their filename. You can do this like so:
const webpackConfig = {
  ...
  output: {
    filename: '[name]-[chunkhash].js',
    chunkFilename: '[name]-[chunkhash].js'
  },
  ...
}
How to use the ExtractTextPlugin
You need to tell the ExtractTextPlugin to create one css file per chunk, so make sure you are not using a fixed filename for it:
const webpackConfig = {
  …
  plugins: [
    ...
    new ExtractTextPlugin({
      filename: '[name]-[chunkhash].css'
    })
    ...
  ],
  ...
}
You may also want to force some code to be included in the vendor file. Doing so can be handy for modules like normalize.css:
const webpackConfig = {
  …
  entry: {
   app: [join(webpackSource, 'app.js')],
   vendor: [
     'normalize.css'
   ]
 },
  ...
}
So let’s have a look at the resulting bundle:
Webpack optimization
Stat size
Parsed size
Gzipped size
First paint on 3g
and low-end mobile
Webpack 3.6
build time
Optimized single-chunk app
841.94KB
287.42KB
89.64KB
~ 1708 ms
⌀ 9s
Vendor-chunk
App-chunk
Manifest
---
Total
777.63KB
64.31KB
0
---
841.94KB
251.48KB
35.63KB
1.5KB
---
288.61KB
77.87KB
11.35KB
806B
---
90.02KB
~ 1686 ms
⌀ 9.2s
Check out the commit for this improvement right here
Getting advanced with asynchronous lazy loading
In bigger applications, you might have code that is only needed for some parts of your app. Code that some users might never execute — or at least not right away.
It is often a good idea to split these parts apart of your main bundle, to reduce the initial payload of your app.
Since manually splitting can be somewhat difficult we’ll automate it:
new webpack.optimize.CommonsChunkPlugin({
  name: 'vendor',
  minChunks: ({ resource }) => (
    resource !== undefined &&
    resource.indexOf('node_modules') !== -1
  ),
}),
new webpack.optimize.CommonsChunkPlugin({
  name: 'main',
  children: true,
  async: true,
  minChunks: ({ resource }) => (
    resource !== undefined &&
    resource.indexOf('node_modules') !== -1
  ),
})
But one more step is missing — we need to tell webpack where to split the code.
This is done by doing dynamic imports by using the import() syntax that in turn implements a promise interface.
System.import(/* webpackChunkName: "chunkName" */ 'path/to/code.js')
.then(module => module.default)
.then(yourModule => yourModule('do sth'))
If you are using react-router, you should read this guide on dynamic routing (Note: In the article they are using the old require.ensure syntax from webpack 1. You should go for using the new import syntax when using webpack)
Preact users can use preact-async-route to enable dynamic routing.
For Vue.js users a solution can be found in the Vue.js docs. Angular provides lazy loading via the loadChildren property on routes.
Webpack optimization
| Stat size | Parsed size | Gzipped size | First paint on 3g and low-end mobile | Webpack v3.6 | build time |
|---|---|---|---|---|---|
| intentionally unoptimized | 1.69MB | 1.76MB | 399.17KB | ~ 3292 ms | ⌀ 6.2 s |
| webpack -p | 1.65MB | 640.45KB | 208.79KB | ~ 2276 ms | ⌀ 7.9 s |
| manually optimized | 1.56MB | 564.25KB | 166.39KB | ~ 2240 ms | ⌀ 10.9 s |
| CMA with modules syntax | 1.51MB | 558.71KB | 165.48KB | ~ 2200 ms | ⌀ 11.2 s |
| without Moment.js locales | 1.19MB | 398.78KB | 121.71KB | ~ 1948 ms | ⌀ 10.1 s |
| date-fns instead of Moment.js | 1.09MB | 354.23KB | 107.27KB | ~ 1902 ms | ⌀ 9.8 s |
| babel-preset-env | 1.09MB | 354.23KB | 107.27KB | - | ⌀ 9.8 s |
Check out the commit for this improvement on GitHub.
As you can see the total size increased somewhat. But for the first page load we only need to load the vendor chunk, the app chunk and the manifest. The assets chunk will be loaded later when the user navigates to the assets route of our app.
This means the user only has to load 79.09KB when they visit the page instead of 90.02KB (gzipped). The benefit will increase significantly when the app is more complex compared to our very simple file-upload-example app.
Summary
This blog post concludes this series on webpack optimization. We have come a long way since working with the webpack-bundle-analyzer in the first post, using the loaderOptionsPlugin in part two and parsing with Moment.js in part three.
But there are still ways to update assets such as images and fonts to reduce your bundle even further. I will write about this and many more tricks in a future blog post.
What's next
Getting started with Contentful is easy and free. Just head over to our sign-up page and create your account. You will be up and running in no time with our reliable content infrastructure.